ABS Pack Help Center
ABS Pack augments Salesforce with everything you need to successfully implement account-based sales for your team.
What is Account Based Sales?
ABS is a the most effective B2B sales approach for companies where the new acquisition of customers is the primary focus. It entails:
- Focus on selected target accounts
- Personalized outbound prospecting
- Specialized sales roles ("division of labor")
- Sales and Marketing orchestration
Read more about account-based sales and where Salesforce is falling short.
Understanding Account Based Salesforce
We recommend these two resources
Prerequisites & Settings
Install ABS Pack from the Salesforce Appexchange.
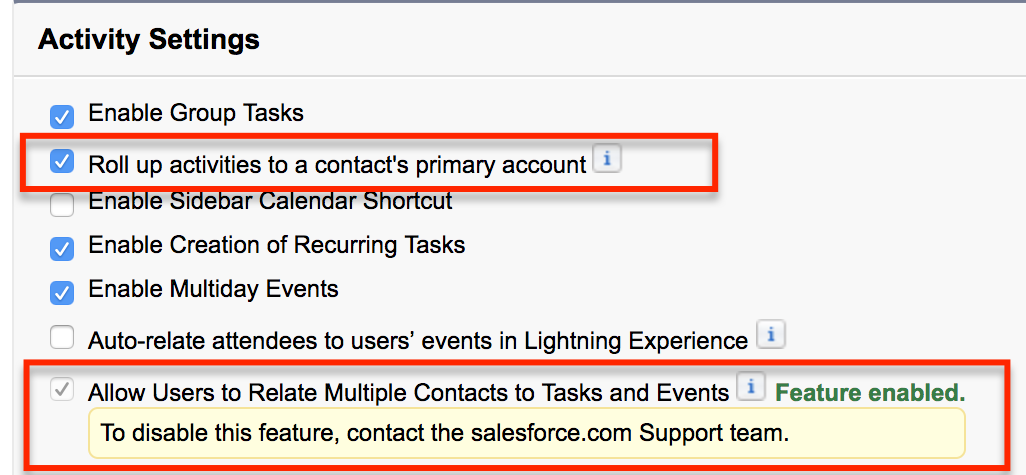
In order for ABS Pack to work properly, we recommend these Salesforce settings:
- Setup > Customize > Activities > Activity Settings
- "Roll up activities to a contact's primary account"
- "Allow Users to Relate Multiple Contacts to Tasks and Events"
- My Domain should be enabled for best results on Salesforce Lightning
Furthermore we recommend that your sellers track their activities in Salesforce. This applies mainly for emails and calendar events. You have several options:
- Use the BCC-Salesforce feature
- Use Einstein Activity Capture
- Use a 3rd party sales engagement system that includes email/calendar sync
Completing the Installation Process
Once you have installed the managed package, you have to complete the installation process by following these steps:
- From the list of available tabs, open the tab "ABS Dashboard".
- In the ABS Dashboard navigate to the tab "Setup".
- Click the button "Complete Installation".
ABS Pack will now do an initial scan of all your account and contact records and populate these custom fields:
- Account
- Life Cycle Status
- Activity Status
- Several other custom fields required for the lead matcher and account trend analytics
- Contact
- Job Level
The Daily Account Scan
Completing the installation also schedules a daily Apex job, that re-scans all your account records at 1:00 a.m (in the timezone of the user who installed ABS Pack). Keeping this apex job running is crucial for the weekly and monthly snapshots which powers ABS Pack's account trend analytics.
This job updates account records if their ABS status has changed. All other accounts won't be updated in the daily re-scan.
Add the tab ABS Dashboard
Salesforce Lightning
- From Lightning's Setup click Apps > App Manager.
- In the page "Lightning Experience App Manager" find the app you want to configure and click Edit from the dropdown menu.
- Notice that there might be two rows for each app, representing the Classic and the Lightning version. Pick the Lightning version.
- In the page Apps Settings click on the tab "Navigation Items".
- In the page "Navigation Items" find the tab ABS-Dashboard and add it to the list of selected items.
- Click Save.
- Click on the tab "App Options".
- In the page "App Options" check the box "Disable end user personalization of nav items in this app".
- Click Save.
Salesforce1 (Mobile App)
- From Lightning's Setup click Apps > Mobile Apps > Salesforce > Salesforce Navigation.
- In the page "Mobile Navigation" find the tab ABS-Dashboard and add it to the list of selected items.
- Click Save.
Salesforce Classic
- From Setup click Create > Apps.
- In the page "Apps" find the app you want to configure and click Edit.
- In the section "Choose the Tabs" find the tab ABS-Dashboard and add it to the list of selected tabs.
- Check the box "Overwrite Users' Personal Custom App Customizations".
- Click Save.
Add ABS Pack Fields to Your Account Page Layouts
Once you have completed the installation process, it's time to surface the ABS fields on the account page layouts.
We recommend that you create a page layout section called "Account Status" that surfaces these ABS Pack fields:
- Life Cycle Status (not Read-Only)
- Prospecting Paused Until (not Read-Only)
- Activity Status (Read-Only)
ABS Pack includes several other custom fields that are irrelevant to end users. Thus, you shouldn't add them to your page layouts.
Note: These fields are automatically populated by ABS pack. However there are cases where (according to the account-based sales process) users are supposed to set the field Life Cycle Status to the value "Churned Customer" or "Disqualified Forever". Setting this field to any other values is pointless, as ABS Pack would overwrite the user's update instantly (through a trigger) or in the course of the daily account re-scan (via scheduled Apex). However, users might be confused by all picklist values being selectable.
If you have account record types defined, we recommend that you restrict the picklist values for all profiles/record types to the the values "Churned Customer" or "Disqualified Forever". That way users don't get confused by giving them the ability to set that field to a value that ABS pack would overwrite.
Add ABS Pack Fields to Your Contact/Lead Page Layouts
ABS Pack adds two custom picklist fields to the contact and to the lead object.
We recommend that you create a page layout section that surfaces the two ABS Pack fields.
- Job Level (Read-Only)
- Persona (Read-Only)
These fields can be used in order to optimize marketing and sales messaging based on the lead's/contact's persona. They can be synced to your marketing automation or sales prospecting software such as Marketo, Hubspot, Outreach.io, Groove or Salesloft.
Persona Detection
Understanding "Personas"
When you are selling to companies (a.k.a. B2B sales), it is key to engage with the right contacts working at these companies. Usually the nature of what you are selling determines with whom you should engage. E.g. if you are selling software for sales people, you should interact with sales leaders and people in charge of business systems. But it's probably not relevant to engage with people in the accounting department. It is also favorable to focus on people as high up in the org chart as possible.
That said, we are dealing with two "dimensions" of contacts:
- Their "job level" - e.g. C-Level, VP-Level, Director, etc.
- The "department" they are working in - a.k.a. their job function
It's obvious that contacts have incentives and an agenda that is mainly determined by their job function and their job level. Thus, when you are engaging with them (marketing, cold outreach or sales interactions), you must speak "the persona specific language" that resonates best with each contact. E.g. in the example above, a sales leader might be most interested in revenue growth and forecast accuracy, while sales ops is more interested in ease of use, migration and support.
Persona ≠ Contact Role
Notice how Salesforce allows you to define "Opportunity Contact Roles" and track what role a contact has in the purchase process (e.g. Executive Buyer, Evaluator, Technical Buyer). These roles as they are predefined in Salesforce tell very little about the contact's agenda and what message resonates best. This is NOT what we mean by "persona" and it's important to understand the difference.
Defining Personas
The straightest way to define personas is to ask yourself, what are the various types of contacts you are usually dealing with in the sales process. That should give you a list of 3-8 different types of contacts. But that's not your list of personas yet. The next step is to think about what each of these types of contacts care about most and which of your key selling points are relevant for them. You will notice that the relevant key selling points for each type have a large overlap. Based on that overlap, try to reduce the number to 2-3 and you have your list of personas.
For instance, in the example above you might have these types of contacts: Sales VPs, Chief Revenue Officers, Sales Managers, Sales Ops Managers, CRM Program Managers, IT Managers. Based on what these types of contacts care about, it turns out that the key selling points are the same for these types of personas.
- Sales Leader: Sales VPs, Chief Revenue Officers, Sales Managers
- Sales Ops: Sales Ops Managers, CRM Program Managers, IT Managers
Once you have found your personas, it's time to configure ABS Pack.
Configuring Personas in ABS Pack
Follow these steps:
- From Setup open Create > Picklist Value Sets
- In the list find the Global Value Sets "Persona" and click on it.
- In the list "Values" click "New" and add the names of the personas.
Once you have followed these steps, the picklist field "Persona" on the lead and contact object have these values selectable. However, users are not supposed to edit these fields, as ABS Pack will populate these fields based on rules.
Training ABS Pack to Detect Personas Automatically
ABS Pack can be "trained" to detect personas automatically. The training data is based on so called "Persona Clues". The idea behind persona clues is that specific keywords or their co-occurrence in a contact's job title typically are indicative to a specific persona. This is why ABS Pack analyzes a large sample of your contact's job titles and gives you a report on frequent keywords or frequent co-occurrences - we call this report the list of "persona clues". You can then review this list and if you find a persona clue that is indicative of a specific persona, you tag it as such. Once you have tagged all your persona clues (which completes the training process), ABS Pack will scan all your contact/lead records and populate the field "Persona" accordingly. Also, moving forward, a trigger on the contact/lead object populates the field for new or updated contact/lead records.
Contact support@abs-pack.com in order to be guided through the training process in detail.
Enable Lead to Account Match Detection
Why Lead Matching?
In account based sales (ABS) and account based marketing (ABM), you are using your inventory of contacts on your target accounts for marketing campaigns. You wouldn't use leads in Salesforce, as their association to target accounts is not obvious - which is due to the Salesforce data model.
But it is very common for marketing systems such as Marketo or Eloqua to generate leads in Salesforce for each "conversion". E.g. you run a campaign that wants prospects to download a white paper, and each time somebody downloads it, a lead is generated in Salesforce. However, the person behind the lead is not unknown - it's a contact on one of your target accounts, which is why the person became part of the campaign in the first place.
What follows is that in account based sales, inbound leads are mainly an engagement signal on one of your target accounts. But as leads are not tied to accounts in Salesforce, you need a lead matcher that automatically associates leads with target accounts.
Enabling ABS Pack's Lead Matcher
The lead matcher, associates leads with accounts using a junction object called "Lead Match". Each time a lead is created or updated, a trigger on the lead object executes the lead matching logic and tries to find one or more matching accounts, based on the lead's email domain, company name, or website.
IMPORTANT: Before you start, make sure, you have completed the setup process and the daily account scan is running periodically.
Lead Matches are surfaced in the related lists you add to the account and lead page layouts.
What follows is that in account based sales, inbound leads are mainly an engagement signal on one of your target accounts. But as leads are not tied to accounts in Salesforce, you need a lead matcher that automatically associates leads with target accounts.
Step 1: Account Page Layout
- Add the related list "Lead Matches" to the account page layout
- Disable all buttons in the related list
- Add these fields:
- Match Type
- Lead
- Lead Source
- Lead Status
- Job Level (Optional)
- Persona (Optional)
- Lead Created
- Convert
- Sort leads by the field Lead Created (Descending)
Step 2: Lead Page Layout
- Add the related list "Lead Matches" to the account page layout
- Disable all buttons in the related list
- Add these fields:
- Match Type
- Account
- Lead Source
- Account Owner
- Account Status
- Persona (Optional)
- Created Date
- Convert
- Sort accounts by the field Created Date (Descending)
Step 3: Lead Page Layout
The trigger on the lead object is deactivated by default. To activate the trigger follow these steps:
- From Setup click Develop > Custom Settings
- On the Custom Settings page find the row "ABS Pack Settings" and click "Manage"
- In the page ABS Pack Settings, click "Edit" and activate the checkboxes:
- "Enable Lead Matching on Lead Creation" if you want the lead matcher to run each time a lead is created (recommended).
- "Enable Lead Matching on Lead Update" if you want the lead matcher to run each time a lead is updated. That only makes sense if you expect the fields Email, Website or Company to be changed in a relevant way.
- Sort accounts by the field Created Date (Descending)
Running the Lead Matcher Retroactively
Once the lead matcher is up and running, only new/updated leads will be matched against accounts. However, your existing leads won't be matched.
In order to match all existing leads, follow these steps:
- Open the developer console
- In the developer console click Debug > Open Execute Anonymous Window
- Paste this line of code
Absf.AbSfScanner.runInitialLeadMatching(); - Click the button "Execute"
The lead matcher will now scan all your leads for matches against accounts.
WARNING: Running the lead matcher retroactively might take several hours or even days, depending on the number of leads in your org. It might also exhaust your daily Batch Apex Limits. We recommend you start this process on a Friday night.